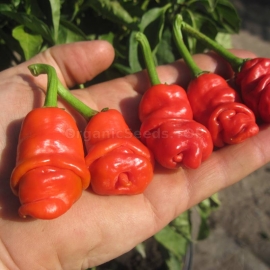


«Peter» - Organic Hot Pepper Seeds
-
Heirloom Hot Pepper «Peter»
The plants can reach two feet in height and produce good amounts of little conversation starters. The fruit can be used green but they mature to a beautiful red color and can be dried and ground for chili powder.
Originally released commercially by the late H. W. Alfrey of Knoxville, Tennessee, he named the variety for its obvious similarity in appearance to a male anatomical part. Our 'Peter' pepper seeds also come from Tennessee being grown for us by our friend David Pendergrass.
Peter peppers range from medium-hot to pretty darn fiery (reportedly in the 20,000 to 30,000 Scoville Units range and are good tasting (great for spicing up salsa as well as conversation).
How to Grow
Chilli peppers are a warm growing plant that has a long time to maturity (usually about 70-100 days). This requires that you start them ahead of time in all but tropical climates where they grow like weeds. Pepper seedlings are quite tough and benefit from transplanting so start in a flat to separate out after sprouting.
Seeds should be soaked in room temperature water for about 30 mins to soften the seed coat. They should be placed, spaced about ½” at least, on pre moistened soil and covered with approximately 1/8” of potting mix. Water in well. Since chilli peppers are a tropical, warm growing plant, bottom heat will both speed up germination and prevent certain cold related rots.
Transplanting
Much like tomatoes, once your chilli pepper plants reach the 3 or 4 leaf stage (the seed leaves plus some true leaves), it is time to transplant them. Take your basic potting mix and add some of your favourite compost and other amendments like blood, kelp or bone meal as directed on the package.
These are quite inexpensive and will really help you have the healthies possible chilli plants. It is also a good idea to add something for a bit of extra drainage as peppers do not like soggy soil. Something like sand or vermiculite. This is best in a 1:3 ratio (sand:soil) for sand and a 1:4 (vermiculite:soil) ratio for vermiculite.
Select a 3 or 4 inch pot and fill it all the way with your pre-moistened potting mix. Separate out your seedlings, always pulling them apart from the roots so you do not break the stems. On a pepper plant, anything below the two initial seed leaves will root. So, like tomato seedlings, bury them “up to the ears”, right up to their lowest set of leaves each in their own pot. If you have lots and want to ensure you get at least one in each pot, you can put two and then thin to the strongest in a week or so. Transplanting like this is important as just the seed root system of a pepper is quite weak.
Continuing Care
Your peppers should be happy in their 3-4” pot until it is time to plant them out, peppers do not get large root systems. Let them dry slightly between watering and provide lots of light. It is a good idea to increase the strength of your fertilizer as the plants grow and you get closer to planting them out as they will use up most of the nutrients in their pots.
The lower leaves may yellow, this is perfectly fine and they can be easily removed with a pair of clean scissors or shears. To strengthen them and prevent mold growing, provide air movement if you grow them in the greenhouse just make sure you open the door and window during the day if it gets too humid inside.

